I would like to share with you an exciting project that I have been involved with for several years. Once a year, a bunch of dedicated volunteers get together for a blanket-making marathon for Blankets of Hope. January 2013 will be the 7th year in Bowie, MD and to date, this group has made over 1,400 blankets! These blankets are sent to the Landsthul Regional Medial facility in Germany for distribution to US soldiers who are ill or injured.
Each handmade blanket gets a hand-made, hand-written note attached to it from the folks who made the blanket. As an avid stamper and card making enthusiast, I enlisted my stamping friends from all over the world to help make 300+ notecards every year. I can't tell you how rewarding it is to see how passionate my friends from ALL OVER THE WORLD are to supporting our troops!
This year I am hoping to provide at least 400 notecards for the project. If you would like to help, please leave a comment and tell me how I can reach you. Here are the particulars:
The notecards must be 4-1/4 x 5-1/2, single panel (not folded) and on sturdy cardstock. You can add layers, embellishments, stamp, ribbon -- anything you want so long as it is securely affixed (these blankets have a long way to travel!). The general theme should be THANK YOU -- they can be patriotic but certainly don't have to be!
Each notecard needs to have a large eyelet attached to a corner so that we can tie them to each completed blanket. The Eyelet Outlet (www.eyeletoutlet.com) has been very supportive and generous -- they are donating 500 eyelets to the project. If you don't have access or know how to add an eyelet to your notecards -- just make sure that you leave me a bit of room in one of the corners -- and I'll add the eyelets to your cards!
The only other requirement is that you leave enough room for a short note from the blanket makers. If you want to sign the back of your notecard -- that's great! You might also want to add where you are from -- I'm sure the soldiers appreciate knowing a bit about the volunteers who make the notecards and the blankets!
Here are some pictures from years past so you can see the blanket making in action -- and get a peak at some of the notecards that have been made. (Not all of the notecards comply with the new guidelines -- lol!)
Monday, November 12, 2012
Friday, November 2, 2012
Chocolate Peanutbutter Acorns
First of all, in full disclosure, I saw these little treats on Pinterest and thought they were just too cute. Our church is having a bake sale tomorrow, and I thought a couple dozen of these yummy acorns would be easy to whip up -- and I bet they are going to be a winner!
The Pinterest photo of these acorns didn't lead to a website or any instructions -- so I came up with my own means to make them.
Ingredients:
A bag of Nutter Butter Bites
Unwrapped Hershey kisses
Chocolate Chips
Here is what the Nutter Butters look like:

Melt a handful of chocolate chips in the microwave, stirring every 20 seconds or so until they are melted and smooth. A 1/4 cup of melted chips will make a LOT of these acorns! The melted chocolate becomes your "glue" to attach the kisses and the chips. First dip the bottom of a kiss into the melted chocolate. I found it easiest to do if I dipped it into the chocolate on the back of the fork.
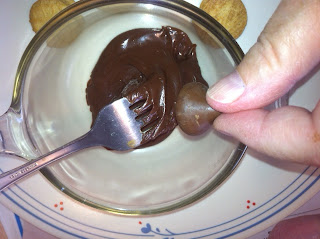
Then "glue" the kiss onto one of the cookies. Many of the cookies are "embossed" on both sides, but some of them have a flat side, I tried to glue the kiss on the flat side if they had one because it would be covered up and the flat side isn't as pretty!

After attaching the kisses, I put them in the fridge to firm up. Then I took them out and did the same thing, on the other side, with a chocolate chip. This one looks kinda messy, most of mine didn't have the little melted chocolate trail! :)

And here is your finished yummy acorn! Isn't it cute? I packaged them up a dozen to a bag and put them in the snack sized zip-lock bags. They fit perfectly!.


Monday, October 29, 2012
Apple Pie Cake Recipe
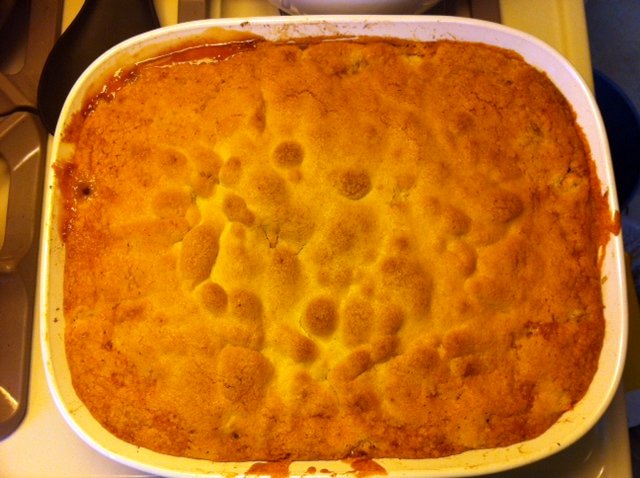
Recipe for Apple Pie Cake. This is unbelievably good -- a family favorite -- and uses ingredients that you probably have in your kitchen right now! (assuming you have apples!)
I use a 10 x 13 casserole dish, but you can use a standard 9 x 12 cake pan as well.
6-8 apples, peeled, cored and sliced
1-2 tsp lemon juice (depending on how sweet/tart the apples are)
1/2 - 1 cup of sugar
1 tsp of cinnamon (or more -- I love cinnamon)
Combine the sliced apples with the lemon juice, sugar and cinnamon and put in the bottom of the casserole dish. Should be about 1-1/2 inch to 2 inches deep.

Then make the cake batter:
1 cup butter
2 cups sugar -- cream together
4 eggs -- add
2 cups flour
2tsp baking powder
1 tsp salt -- add and mix well.
Put big blobs of batter on top of apples.
1 cup butter
2 cups sugar -- cream together
4 eggs -- add
2 cups flour
2tsp baking powder
1 tsp salt -- add and mix well.
Put big blobs of batter on top of apples.

Use a knife or wooden spoon to spread and cover the apples the best you can.

Bake at 350 for about an hour -- until the top is nicely browned and you see some bubbling around the edges.

IF YOU MAKE THIS, YOU HAVE TO TELL ME HOW YOU LIKE IT!
Nancy's Blog -- DAY ONE!
Today is Monday, October 29th. Hurricane Sandy is raging outside. Seemed like the perfect time for my daughter Emily to teach Mom how to create a blog. So here I go!
Subscribe to:
Posts (Atom)